Enter Your Email

Enter your email address:

Delivered by FeedBurner

Custom Search
Showing posts with label Oracle 11G. Show all posts

Sunday, October 31, 2010

Oracle 11gR2 Default Listener - Grid Infrastructure home

Oracle Restart enabled database creation requires Default Listener configured
and running in Grid Infrastructure home. Use NETCA in Grid Infrastructure home - "/u01/app/oracle/product/11.2.0/grid" to configure a listener before proceeding.


I faced this issue when setting up Oracle 11gR2 Standalone with Oracle Grid Control 11gR2 for ASM and restart capabilities, and when selecting Oracle Enterprise Manager I got the above error screen but I have a listener running on Oracle Grid home, but still you see the same error.

This is due to the Listener which should be by default, like the name should be LISTENER and the port should be 1521. Any changes with both will result in the above error.

I dropped the existing listener and re-created a new one with NETCA with the default port and the name which worked.

Tuesday, March 17, 2009

ORA-00845: MEMORY_TARGET not supported on this system

ORA-00845: MEMORY_TARGET not supported on this system


[oracle@server02 ~]$ export ORACLE_SID=testdb

[oracle@server02 ~]$ sqlplus "/ as sysdba"

SQL*Plus: Release 11.1.0.6.0 - Production on Tue Mar 17 05:59:38 2009

Copyright (c) 1982, 2007, Oracle. All rights reserved.

Connected to an idle instance.

SQL> startup

ORA-32004: obsolete and/or deprecated parameter(s) specified

ORA-00845: MEMORY_TARGET not supported on this system


*** This Error occurred when I configured MEMORY_TARGET on a Centos 5.2 64BIT Server.


I found one Doc, which states the cause of the error and to solve the Issue.

The main reason for this error is MEMORY_TARGET or MEMORY_MAX_TARGET cannot be greater than the shared memory filesystem (/dev/shm) on the OS.


[root@bisserver02 ~]# df -h

Filesystem Size Used Avail Use% Mounted on

tmpfs 1.9G 0 1.9G 0% /dev/shm

As per the Document I increased the /dev/shm to 7GB.

[root@server02 ~]# mount -t tmpfs shmfs -o size=7g /dev/shm

[root@server02 ~]# df -h

Filesystem Size Used Avail Use% Mounted on

tmpfs 7.0G 0 7.0G 0% /dev/shm

shmfs 7.0G 0 7.0G 0% /dev/shm

[oracle@server02 ~]$ sqlplus "/ as sysdba"

SQL*Plus: Release 11.1.0.6.0 - Production on Tue Mar 17 06:14:18 2009

Copyright (c) 1982, 2007, Oracle. All rights reserved.

Connected to an idle instance.

SQL> startup

ORACLE instance started.

Total System Global Area 2137886720 bytes

Fixed Size 2146112 bytes

Variable Size 1627390144 bytes

Database Buffers 503316480 bytes

Redo Buffers 5033984 bytes

Database mounted.

Database opened.


1) Reference: http://www.cyberciti.biz/tips/what-is-devshm-and-its-practical-usage.html - /dev/shm

2) Metalink - 465048.1


Thursday, January 15, 2009

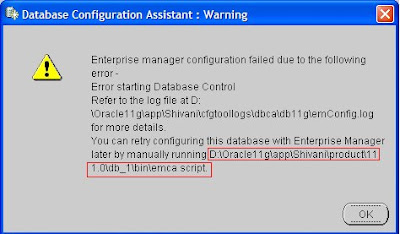
Oracle 11g: oracle.sysman.emcp.exception.EMConfigException: Error starting Database Control

SEVERE: Error starting Database Control
Refer to the log file at D:\Oracle11g\app\Acer-5670\cfgtoollogs\dbca\db11g\emConfig.log for more details.
Jan 15, 2009 7:44:08 PM oracle.sysman.emcp.EMConfig perform
CONFIG: Stack Trace:


I was asked to check with this error which was generated at the time of Database creation on Windows XP SP2 failed at 86% showing the below error.


Jan 15, 2009 7:44:08 PM oracle.sysman.emcp.EMConfig perform

SEVERE: Error starting Database Control

Refer to the log file at D:\Oracle11g\app\Acer-5670\cfgtoollogs\dbca\db11g\emConfig.log for more details.

Jan 15, 2009 7:44:08 PM oracle.sysman.emcp.EMConfig perform

CONFIG: Stack Trace:

oracle.sysman.emcp.exception.EMConfigException: Error starting Database Control

at oracle.sysman.emcp.EMDBPostConfig.performConfiguration(EMDBPostConfig.java:869)

at oracle.sysman.emcp.EMDBPostConfig.invoke(EMDBPostConfig.java:250)

at oracle.sysman.emcp.EMDBPostConfig.invoke(EMDBPostConfig.java:213)

at oracle.sysman.emcp.EMConfig.perform(EMConfig.java:235)

at oracle.sysman.assistants.util.em.EMConfiguration.run(EMConfiguration.java:460)

at java.lang.Thread.run(Thread.java:595)

Jan 15, 2009 7:44:08 PM oracle.sysman.emcp.EMConfig restoreOuiLoc

CONFIG: Restoring oracle.installer.oui_loc to D:\Oracle11g\app\Acer-5670\product\11.1.0\db_1\oui


1. I created a loop back adapter and disabled all the remaining Network connections which did not work.

To create a Loop Back Adapter in Windows XP ->

http://dba-onweb.blogspot.com/2008/01/microsoft-loopback-adapter.html


2. Second Approach – Installed JAVA (http://www.java.com/) and rebooted the laptop to start the DBCA once again to do a fresh setup which in turn worked.

Wednesday, December 24, 2008

1Z-050 Oracle 11g New Features for Administrators: Certified

Well, one more certification added to my list “Oracle 11g New Features for Administrators 1Z-050”.
Most of the time the test is concentrated on new enhancements like
Virtual Private Database
ASM Enhancements
AWR Baselines, SQL Advisior, STS
DIAGNOSTIC_DEST
Direct NFS
Flashback archive
SQL Management Base
MEMORY_TARGET
(+) and a use full resource http://www.amazon.com/OCP-Oracle-Database-11g-Administrators/dp/0071496823 OCP Oracle Database 11g: New Features for Administrators Exam Guide (Exam 1Z0-050) (Osborne Oracle Press) which helps you to build your knowledge on Oracle 11g as well as in getting the Certification.

Good Luck
Ravi Prakash

Monday, December 08, 2008

Cygwin X Window: _X11TransSocketINETConnect() can't get address for localhost:6010: Temporary failure in name resolution

Any Idea with the below error: xterm issue using Cygwin: Connecting from a Windows XP Work Station to a OLE 4.7 on VMWare 1.0.6.

Administrator@TESTDB-02 ~
$
Administrator@TESTDB-02 ~
$ ssh -Y oracle@192.168.2.172
oracle@192.168.2.172's password:
Warning: No xauth data; using fake authentication data for X11 forwarding.
Last login: Mon Dec 8 16:09:50 2008 from TESTDB-02.bis.local
ora11gprod-> xclock
_X11TransSocketINETConnect() can't get address for localhost:6010: Temporary failure in name resolution
Error: Can't open display: localhost:10.0
*** Tried again ****

Administrator@TESTDB-02 ~
$ ssh -Y oracle@192.168.2.172
oracle@192.168.2.172's password:
Warning: No xauth data; using fake authentication data for X11 forwarding.
Last login: Mon Dec 8 16:13:33 2008 from TESTDB-02.bis.local
ora11gprod-> xclock
_X11TransSocketINETConnect() can't get address for localhost:6010: Temporary failure in name resolution
Error: Can't open display: localhost:10.0
I think this is something to do with localhost:10.0 but i am not sure from where its taking...
Any help on this...


It's worked. Guess what?
I missed localhost entry in /etc/hosts.
Added this line to resolve the issue.

Friday, August 22, 2008

Oracle11g libnnz11.so: cannot restore segment prot after reloc: Permission denied

[oracle@oracle11g ~]$ lsnrctl status lsnrctl: error while loading shared libraries: /u01/app/oracle/product/11.1.0/db _1/lib/libnnz11.so: cannot restore segment prot after reloc: Permission denied
Operating System: Virtual Machine: Oracle Enterprise Linux 5.2 (32-bit)
Oracle RDBMS Version: Oracle 11g - 32 bit for Linux

This is the error due to SE Linux running in Enforce mode. The best way to avoid this is – make the SE Linux in Permissive mode. This can be done at the time of Setting up your server (by not selecting the security feature) (or) once the server setup completes you can set the value to 0.
Refer Metalink Doc Note:454196.1

**********************************************************************************

[oracle@oracle11g ~]$ sqlplus / as sysdba
sqlplus: error while loading shared libraries: /u01/app/oracle/product/11.1.0/db_1/lib/libnnz11.so: cannot restore segment prot after reloc: Permission denied

[oracle@oracle11g ~]$

I could able to solve this, by following the above Metalink Document. Hope this helps you.

[oracle@oracle11g ~]$ sqlplus / as sysdba
SQL*Plus: Release 11.1.0.6.0 - Production on Fri Aug 22 15:30:06 2008
Copyright (c) 1982, 2007, Oracle. All rights reserved.
Connected to an idle instance.

Friday, August 01, 2008

Oracle Database 11g Top New Feature for DBAs

Oracle Database 11g Top New Feature for DBAs : SUMMARY

1) Automatic Diagnostic Repository [ADR]

2) Database Replay

3) Automatic Memory Tuning

4) Case sensitive password

5) Virtual columns and indexes

6) Interval Partition and System Partition

7) The Result Cache

8) ADDM RAC Enhancements

9) SQL Plan Management and SQL Plan Baselines

10) SQL Access Advisor & Partition Advisor

11) SQL Query Repair Advisor

12) SQL Performance Analyzer (SPA) New

13) DBMS_STATS Enhancements

14) The Result Cache

15) Total Recall (Flashback Data Archive)

Note: The above are only top new features, there are other features as well introduced in 11g which will be included subsequently

Thursday, March 13, 2008

Oracle 11g :: Creating Database with ASM using DBCA

Creating and configuring Oracle 11g Database on ASM using Database Configuration Assistant (DBCA).
Prerequisites
1. Oracle Software 11.1.0.6 should already installed on the server. (refer below url for step by step)
http://ravidba-oracle.blogspot.com/2008/07/oracle-11g-step-by-step-installation-on.html
2. ASM Instance should already be created & configured and should be up and running.
http://ravidba-oracle.blogspot.com/2008/03/oracle-11g-configuring-asm-for-oracle.html
Hardware/Software:
VMWare Virtual Node – 2 CPU, 1024 MB
Host Operating System – Windows XP Professional SP 3
Guest Operating System – Oracle Enterprise Linux 4 (Update 5)
Oracle RDBMS – 11.1.0.6
Oracle ASM Instance – 11.1.0.6
1. Run DBCA from a terminal login as Oracle user. You can use PUTTY from a HOST System as well by setting the DISPLAY for x-windows.
Select -> Create Database
2. Select General Purpose, as this is just for testing purpose I want to use all the features of Oracle 11g and as well with the Example schemas. Real time i would prefer to create a seed database which would be CUSTOM DATABASE.
3. Database name: Here its db11g (You can choose as you like not more than 8 Characters)
4. Enterprise Manager Option
4 -1 . Warning : To configure Listener, so from a new terminal we need to run netca, please follow below URL for step by step on this.
http://ravidba-oracle.blogspot.com/2008/03/oracle-11g-netca-listener-configuration.html
Once you are done with NETCA configuring the LISTENER, Continue
5. I prefer to use same password (Just for testing Purpose and easy to remember)
6. Select Automatic Storage Management (ASM). Make sure that ASM instance is up & running and the LISTENER associated with it should be running as well.
7. ASM - SYS password "It should be same as what you entered when setting up ASM Instance"
8. Select the Disk Group Name which you would like your new database to use. Make sure that the disks are mounted and the Redundancy as set according to your needs.
9.Use Oracle-Managed Files - Location of the Database Area "+DATA" which it keeps all the datafiles, controlfiles, archive etc.
10. Flash Recovery Area, if your prefer (recommended) so many features that help DBA.
Enable Archiving.
11. Select Sample Schemas
12. Memory Management - I prefereed to use Automatic Memory Management to test Oracle 11g. As default it takes 40%, I set it to 28%. Rest of the tabs, i left default.
13. Security Settings - New feature of Oracle 11g. I preferred to keep pre-11g default security settings.
14. One more New Feature - > Automatic Maintenance tasks.
15. Database Storage - Location of Control file, size of redo and Datafiles.
16. Creation Options - Template (which i want to use) and the database creation script which i prefer to keep it for further reference.
17. Database creation complete.

I have my new Oracle 11g database with ASM as storage, and what all remained is i need to test the new features of Oracle 11g and to gain hands on - and plan to give Oracle 11g Upgrade for Administrators.

Wish me luck - Ravi Prakash

Wednesday, March 12, 2008

Oracle 11g :: netca (Listener Configuration for Oracle 11g Database)

Sometimes you need to run netca manually to configure Listener for your database. In Oracle 11g i found this message as a warning when selecting Database Control Configuration.

So planned to document this and of course this is one of the part of Oracle 11g Installation.
1. Open a terminal as a Oracle user and run netca.
Select -> Listener Configuration
2. Select Add, as we are going to create a LISTENER for a new setup. If we have any existing listener running on the Server, remain options will be highlight like "delete" "re-configure" etc.
3. Listener Name, or you can leave the existing one.
4. TCP is selected as default.
5. Select the Port here (or) you can leave the default port.


Oracle 11g :: Configuring ASM for Oracle 11g RDBMS

Setting up and configuring storage with ASM for Oracle 11g RDBMS
VMWare Version 1.0.8
Host Operating System: Windows XP – 32 Bit
Guest Operating System: OLE 4 (Update 5)
Oracle RDBMS Version: 11.1.0.6.0

Prerequisites
1. Oracle Software 11.1.0.6 should already installed on the server.

Click here -> For Step by step http://ravidba-oracle.blogspot.com/2008/07/oracle-11g-step-by-step-installation-on.html
2. Raw disks should already be formatted using fdisk and should be available to the server.

3. Disk Label should be created with ORACLE ASM LIB.
http://ravidba-oracle.blogspot.com/2007/05/oracle-10gr2-automatic-storage.html

** Please download Oracle ASM Lib from OTN.
oracleasmlib-2.0.2-1.i386.rpm (or) you can configure this when you setup Linux by selecting
System Tools -> oracle oracleasm-2.6.9.. (driver for UP kernel).
[root@oracledb2 init.d]# ls -ltr oracleasm*
-rwxr-xr-x 1 root root 18114 Oct 24 2006 oracleasm
[root@oracledb2 init.d]# pwd
/etc/init.d
Usage: /etc/init.d/oracleasm {startstoprestartenabledisableconfigurecreatediskdeletediskquerydisklistdisksscandisksstatus}
http://ravidba-oracle.blogspot.com/2007/05/oracle-10gr2-automatic-storage.html
For rest of the steps please follow the above URL to add the disks using oracleasm.
[root@oracledb2 init.d]# /etc/init.d/oracleasm listdisks
VOL1
VOL2
VOL3
Once you have the disks in place, login as Oracle user and run DBCA
1. Select Configure Automatic Storage Management : Step 1 of 4 -> Click Next

2. A warning screen will appear. For ASM (Automatic Storage Management) the Oracle Cluster Synchronization Service (CSS) needs to be running. All you need to do is - login as a root user and run the localconfig reset from $ORACLE_HOME/bin directory, as shown in the below screen.

3. Open a termial / Putty section login as a root user, and execute localconfig reset from $ORACLE_HOME/bin.
Once you have the message "Oracle CSS service is installed and running under init" you can click "OK" at the warning screen.
4. Specify the password for the SYS user. (This is for ASM Instance).
5.
6.
7. I have missed few of the screens, you need to assign the Disk Group Name, assign the Volumes that we create before and select the redundancy. I created two Disk Group's.
+DATA/DB11G
CONTROLFILE/
DATAFILE/
ONLINELOG/
PARAMETERFILE/
TEMPFILE/
spfiledb11g.ora => +DATA/DB11G/PARAMETERFILE/spfile.280.674840503
And the second group RECOVERYDEST/ for FLASH recovery area.
8. Mount the Disks - Click Mount All

9. Mounting Disk Groups...10. Disks are mounted, Next we create database.
Please refer my next post

Tuesday, March 04, 2008

Oracle 11G Step by Step Installation on Enterprise Linux 4

Oracle 11g(11.1): Step by Step Installation on Enterprise Linux 4
Will update the notes soon....


Copyright © 2005 - 2008 DBA-ONWeb Technical blog. All rights reserved