

 Posts
Posts


Custom Search
Showing posts with label Linux VMWare. Show all posts
Showing posts with label Linux VMWare. Show all posts
Saturday, October 02, 2010


Tuesday, March 17, 2009
ORA-00845: MEMORY_TARGET not supported on this system
ORA-00845: MEMORY_TARGET not supported on this system
[oracle@server02 ~]$ export ORACLE_SID=testdb
[oracle@server02 ~]$ sqlplus "/ as sysdba"
SQL*Plus: Release 11.1.0.6.0 - Production on Tue Mar 17 05:59:38 2009
Copyright (c) 1982, 2007, Oracle. All rights reserved.
Connected to an idle instance.
SQL> startup
ORA-32004: obsolete and/or deprecated parameter(s) specified
ORA-00845: MEMORY_TARGET not supported on this system
*** This Error occurred when I configured MEMORY_TARGET on a Centos 5.2 64BIT Server.
I found one Doc, which states the cause of the error and to solve the Issue.
The main reason for this error is MEMORY_TARGET or MEMORY_MAX_TARGET cannot be greater than the shared memory filesystem (/dev/shm) on the OS.
[root@bisserver02 ~]# df -h
Filesystem Size Used Avail Use% Mounted on
tmpfs 1.9G 0 1.9G 0% /dev/shm
As per the Document I increased the /dev/shm to 7GB.
[root@server02 ~]# mount -t tmpfs shmfs -o size=7g /dev/shm
[root@server02 ~]# df -h
Filesystem Size Used Avail Use% Mounted on
tmpfs 7.0G 0 7.0G 0% /dev/shm
shmfs 7.0G 0 7.0G 0% /dev/shm
[oracle@server02 ~]$ sqlplus "/ as sysdba"
SQL*Plus: Release 11.1.0.6.0 - Production on Tue Mar 17 06:14:18 2009
Copyright (c) 1982, 2007, Oracle. All rights reserved.
Connected to an idle instance.
SQL> startup
ORACLE instance started.
Total System Global Area 2137886720 bytes
Fixed Size 2146112 bytes
Variable Size 1627390144 bytes
Database Buffers 503316480 bytes
Redo Buffers 5033984 bytes
Database mounted.
Database opened.
1) Reference: http://www.cyberciti.biz/tips/what-is-devshm-and-its-practical-usage.html - /dev/shm
2) Metalink - 465048.1
Saturday, December 13, 2008
VMWare: Network Adapters
Reference to the OTN discussion
1. Virtual Network Editor.
 2. Summary Page - Listed available Virtual network
 3. VMWare Server - Virtual Node Information, List of Devices on RAC 2

4. VMWare Server - Virtual Node Information, List of Devices on RAC 1

1. Virtual Network Editor.
 2. Summary Page - Listed available Virtual network
 3. VMWare Server - Virtual Node Information, List of Devices on RAC 2
4. VMWare Server - Virtual Node Information, List of Devices on RAC 1

Monday, December 08, 2008
Cygwin X Window: _X11TransSocketINETConnect() can't get address for localhost:6010: Temporary failure in name resolution
Any Idea with the below error: xterm issue using Cygwin: Connecting from a Windows XP Work Station to a OLE 4.7 on VMWare 1.0.6.
Administrator@TESTDB-02 ~
$
Administrator@TESTDB-02 ~
$ ssh -Y oracle@192.168.2.172
oracle@192.168.2.172's password:
Warning: No xauth data; using fake authentication data for X11 forwarding.
Last login: Mon Dec 8 16:09:50 2008 from TESTDB-02.bis.local
ora11gprod-> xclock
_X11TransSocketINETConnect() can't get address for localhost:6010: Temporary failure in name resolution
Error: Can't open display: localhost:10.0
*** Tried again ****
Administrator@TESTDB-02 ~
$ ssh -Y oracle@192.168.2.172
oracle@192.168.2.172's password:
Warning: No xauth data; using fake authentication data for X11 forwarding.
Last login: Mon Dec 8 16:13:33 2008 from TESTDB-02.bis.local
ora11gprod-> xclock
_X11TransSocketINETConnect() can't get address for localhost:6010: Temporary failure in name resolution
Error: Can't open display: localhost:10.0
I think this is something to do with localhost:10.0 but i am not sure from where its taking...
Any help on this...

It's worked. Guess what?
I missed localhost entry in /etc/hosts.
Added this line to resolve the issue.
Administrator@TESTDB-02 ~
$
Administrator@TESTDB-02 ~
$ ssh -Y oracle@192.168.2.172
oracle@192.168.2.172's password:
Warning: No xauth data; using fake authentication data for X11 forwarding.
Last login: Mon Dec 8 16:09:50 2008 from TESTDB-02.bis.local
ora11gprod-> xclock
_X11TransSocketINETConnect() can't get address for localhost:6010: Temporary failure in name resolution
Error: Can't open display: localhost:10.0
*** Tried again ****
Administrator@TESTDB-02 ~
$ ssh -Y oracle@192.168.2.172
oracle@192.168.2.172's password:
Warning: No xauth data; using fake authentication data for X11 forwarding.
Last login: Mon Dec 8 16:13:33 2008 from TESTDB-02.bis.local
ora11gprod-> xclock
_X11TransSocketINETConnect() can't get address for localhost:6010: Temporary failure in name resolution
Error: Can't open display: localhost:10.0
I think this is something to do with localhost:10.0 but i am not sure from where its taking...
Any help on this...
It's worked. Guess what?
I missed localhost entry in /etc/hosts.
Added this line to resolve the issue.
Monday, November 03, 2008
Friday, August 22, 2008
VMware Server 2.0 (Beta)
My Hands on VMware Server 2.0(beta)
For almost 16 months I am using VMware server versions from 1.0.2 and there so and my first Hands on Oracle Real Application Clusters (Learning Purpose) is on 1.0.4 went well without any issues. In fact the concept of Virtualization is one of the deemed reason to consolidate the space of Data Centers. My last project with the bank, almost all the utility servers run on Virtualization. It’s got so many advantages, but which is not going to be the topic, now, but if you talk about my personal interests to try this product, it’s always a useful tool for me.
It’s easy to use, like, you can divide your existing system into multiple virtual machines, you can host all the freeware Linux and its compatible with almost all flavors of Linux (Of course I am more used to Enterprise Linux from Oracle).
For almost 16 months I am using VMware server versions from 1.0.2 and there so and my first Hands on Oracle Real Application Clusters (Learning Purpose) is on 1.0.4 went well without any issues. In fact the concept of Virtualization is one of the deemed reason to consolidate the space of Data Centers. My last project with the bank, almost all the utility servers run on Virtualization. It’s got so many advantages, but which is not going to be the topic, now, but if you talk about my personal interests to try this product, it’s always a useful tool for me.
It’s easy to use, like, you can divide your existing system into multiple virtual machines, you can host all the freeware Linux and its compatible with almost all flavors of Linux (Of course I am more used to Enterprise Linux from Oracle).
I thought of giving a try with Enterprise Linux 5.2 from Oracle, but the VMware 1.0.6 / 1.0.4 as still don’t have VMware Tools are not there for Linux 5.2 so I used face few difficulties with the Console and of course with the Display.
I am happy to see the VMware Server 2.0 which got support of almost all the Operating systems, from Microsoft Win 3.1 to Windows 2008 (64 bit) & for Linux 5 versions.
The things i like more in VMware Server 2.0 (beta).
1) Guest Operating System's - Support to all Windows operating system from 3.1 to Windows 2008 Server, and even for Windows Vista.
 2) Same for Linux. (Enterprise Linux from Oracle Corp. 5.0)
 3) The Web Interface - With the Host Configuration Details.
 4) The status of Guest OS and the Hardware Version etc.,
 5) The Pop-up window of guest OS.
So whats waiting for, just give a try. I have Enterprise Linux 5.2 from Oracle running on this, which i want to give a try with Oracle 11g.
Ravi Prakash
Friday, August 01, 2008
Configure and mount a new disk in Enterprise Linux
In Previous section we saw how to add storage (Disk) to an existing OS. This section we go ahead with configuring and mounting the file system, in Enterprise Linux.
1) Use putty to connect to the Guest Operating system from your Host operating system. ## You can refer How to connect host and Guest OS in VMWare.
 2)
2)
Login as root
login as: root
root@192.168.2.135's password:
Last login: Fri Aug 1 13:12:56 2008 from 192.168.2.130
[root@oracledb2 ~]#
 3)
3)
Browse for the newly added disk in Linux using, you can see the newly added disk with /dev/sdb does’t contain a valid partition table.
[root@oracledb2 ~]# fdisk -l
Disk /dev/sda: 21.4 GB, 21474836480 bytes
255 heads, 63 sectors/track, 2610 cylinders
Units = cylinders of 16065 * 512 = 8225280 bytes
Device Boot Start End Blocks Id System
/dev/sda1 * 1 637 5116671 83 Linux
/dev/sda2 638 1718 8683132+ 83 Linux
/dev/sda3 1719 2355 5116702+ 83 Linux
/dev/sda4 2356 2610 2048287+ 5 Extended
/dev/sda5 2356 2610 2048256 82 Linux swap
Disk /dev/sdb: 10.7 GB, 10737418240 bytes
255 heads, 63 sectors/track, 1305 cylinders
Units = cylinders of 16065 * 512 = 8225280 bytes
Disk /dev/sdb doesn't contain a valid partition table
[root@oracledb2 ~]#

4) Create a partition using fdisk /dev/sdb
[root@oracledb2 ~]# fdisk /dev/sdb
Device contains neither a valid DOS partition table, nor Sun, SGI or OSF disklabel
Building a new DOS disklabel. Changes will remain in memory only,
until you decide to write them. After that, of course, the previous
content won't be recoverable.
The number of cylinders for this disk is set to 1305.
There is nothing wrong with that, but this is larger than 1024,
and could in certain setups cause problems with:
1) software that runs at boot time (e.g., old versions of LILO)
2) booting and partitioning software from other OSs
(e.g., DOS FDISK, OS/2 FDISK)
Warning: invalid flag 0x0000 of partition table 4 will be corrected by w(rite)
Command (m for help): n ### Select n here
Command action
e extended
p primary partition (1-4) ### Select P for a primary partition
p
Partition number (1-4): 1
First cylinder (1-1305, default 1): 1
Last cylinder or +size or +sizeM or +sizeK (1-1305, default 1305): 1305
Command (m for help): w
The partition table has been altered!
Calling ioctl() to re-read partition table.
Syncing disks.
[root@oracledb2 ~]#

5) You can check the new partition
[root@oracledb2 ~]# fdisk -l
Disk /dev/sda: 21.4 GB, 21474836480 bytes
255 heads, 63 sectors/track, 2610 cylinders
Units = cylinders of 16065 * 512 = 8225280 bytes
Device Boot Start End Blocks Id System
/dev/sda1 * 1 637 5116671 83 Linux
/dev/sda2 638 1718 8683132+ 83 Linux
/dev/sda3 1719 2355 5116702+ 83 Linux
/dev/sda4 2356 2610 2048287+ 5 Extended
/dev/sda5 2356 2610 2048256 82 Linux swap
Disk /dev/sdb: 10.7 GB, 10737418240 bytes
255 heads, 63 sectors/track, 1305 cylinders
Units = cylinders of 16065 * 512 = 8225280 bytes
Device Boot Start End Blocks Id System
/dev/sdb1 1 1305 10482381 83 Linux
[root@oracledb2 ~]#
7) Mount the new file system
 8) Make sure that you add this new mount point to /etc/fstab to auto mount next time when you restart the server.

Your disk is ready, restart the VMWare Guest OS and check if you can see the mount point auto mounted.
1) Use putty to connect to the Guest Operating system from your Host operating system. ## You can refer How to connect host and Guest OS in VMWare.
 2)
2)Login as root
login as: root
root@192.168.2.135's password:
Last login: Fri Aug 1 13:12:56 2008 from 192.168.2.130
[root@oracledb2 ~]#
 3)
3)Browse for the newly added disk in Linux using, you can see the newly added disk with /dev/sdb does’t contain a valid partition table.
[root@oracledb2 ~]# fdisk -l
Disk /dev/sda: 21.4 GB, 21474836480 bytes
255 heads, 63 sectors/track, 2610 cylinders
Units = cylinders of 16065 * 512 = 8225280 bytes
Device Boot Start End Blocks Id System
/dev/sda1 * 1 637 5116671 83 Linux
/dev/sda2 638 1718 8683132+ 83 Linux
/dev/sda3 1719 2355 5116702+ 83 Linux
/dev/sda4 2356 2610 2048287+ 5 Extended
/dev/sda5 2356 2610 2048256 82 Linux swap
Disk /dev/sdb: 10.7 GB, 10737418240 bytes
255 heads, 63 sectors/track, 1305 cylinders
Units = cylinders of 16065 * 512 = 8225280 bytes
Disk /dev/sdb doesn't contain a valid partition table
[root@oracledb2 ~]#

4) Create a partition using fdisk /dev/sdb
[root@oracledb2 ~]# fdisk /dev/sdb
Device contains neither a valid DOS partition table, nor Sun, SGI or OSF disklabel
Building a new DOS disklabel. Changes will remain in memory only,
until you decide to write them. After that, of course, the previous
content won't be recoverable.
The number of cylinders for this disk is set to 1305.
There is nothing wrong with that, but this is larger than 1024,
and could in certain setups cause problems with:
1) software that runs at boot time (e.g., old versions of LILO)
2) booting and partitioning software from other OSs
(e.g., DOS FDISK, OS/2 FDISK)
Warning: invalid flag 0x0000 of partition table 4 will be corrected by w(rite)
Command (m for help): n ### Select n here
Command action
e extended
p primary partition (1-4) ### Select P for a primary partition
p
Partition number (1-4): 1
First cylinder (1-1305, default 1): 1
Last cylinder or +size or +sizeM or +sizeK (1-1305, default 1305): 1305
Command (m for help): w
The partition table has been altered!
Calling ioctl() to re-read partition table.
Syncing disks.
[root@oracledb2 ~]#

5) You can check the new partition
[root@oracledb2 ~]# fdisk -l
Disk /dev/sda: 21.4 GB, 21474836480 bytes
255 heads, 63 sectors/track, 2610 cylinders
Units = cylinders of 16065 * 512 = 8225280 bytes
Device Boot Start End Blocks Id System
/dev/sda1 * 1 637 5116671 83 Linux
/dev/sda2 638 1718 8683132+ 83 Linux
/dev/sda3 1719 2355 5116702+ 83 Linux
/dev/sda4 2356 2610 2048287+ 5 Extended
/dev/sda5 2356 2610 2048256 82 Linux swap
Disk /dev/sdb: 10.7 GB, 10737418240 bytes
255 heads, 63 sectors/track, 1305 cylinders
Units = cylinders of 16065 * 512 = 8225280 bytes
Device Boot Start End Blocks Id System
/dev/sdb1 1 1305 10482381 83 Linux
[root@oracledb2 ~]#
6) Format the Newly added partition and add a label to it.

7) Mount the new file system
 8) Make sure that you add this new mount point to /etc/fstab to auto mount next time when you restart the server.
Your disk is ready, restart the VMWare Guest OS and check if you can see the mount point auto mounted.
VMWare: Adding a disk to VMware Guest OS
Adding a disk to a exisiting VMWare Guest OS.
Technology Used.
1) VM Ware Version: 1.04 build-56528
http://www.vmware.com/
2) Oracle Enterprise Linux 4.2
www.edelivery.com/linux
Purpose: Add a new disk to existing VMWare Enterprise Linux OS and make it in use.
Step by Step
1) Make sure the guest operating system (Enterprise Linux) is shutdown, to add a new disk.
2) Open the VMWare Server Console and select the Guest OS in the Inventory tab.
3) On the Commands tab, click Edit Virtual machine settings.
4) A pop window appears, Virtual Machine Settings, with the existing settings, click Add button at the bottom.
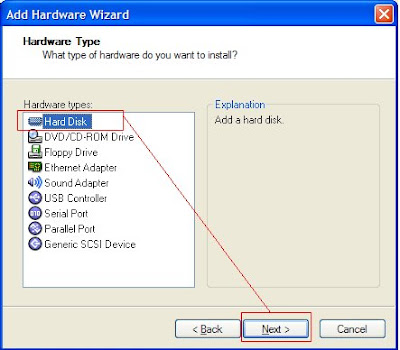
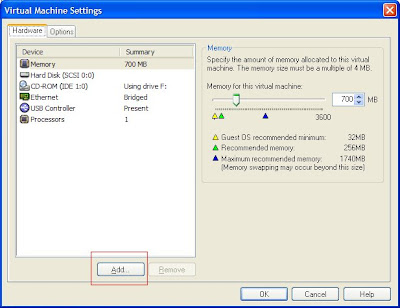 5. Select Hard Disk from the Add Hardware wizard from VMWare Server console & click next to continue further.
 6. Select “Create a new Virtual Disk” and click next to continue
 7. Select a Disk Type – always go with the recommended configuration by VMWare (here I selected as recommended – SCSI) and click next
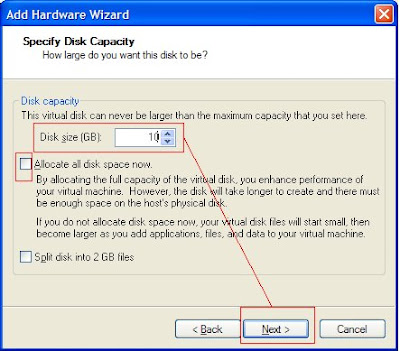
 8. Specify Disk capacity – in my case, i selected 10GB, and I am not selecting “Allocate all disk space now” as it’s always have a advantage, it will use the host filesystem as the file system grows. Click Next to continue.
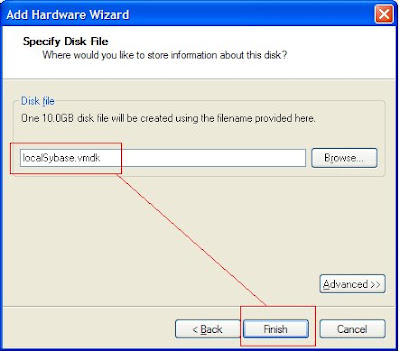
 9. Specify Disk File, Location on your local hard disk and click Finish, to complete the Wizard.
 10. You can see the new add disk, Hard Disk 2. You can start the Operating system, from the VMWare Console to setup the hard disk from the operating system level.
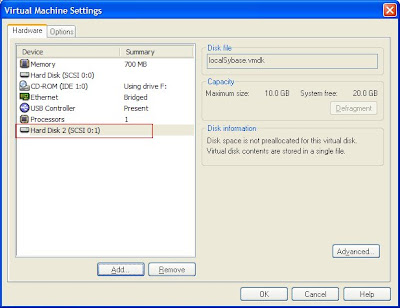 Your new disk is ready at hardware level (Virtual Machine ;-) )
Technology Used.
1) VM Ware Version: 1.04 build-56528
http://www.vmware.com/
2) Oracle Enterprise Linux 4.2
www.edelivery.com/linux
Purpose: Add a new disk to existing VMWare Enterprise Linux OS and make it in use.
Step by Step
1) Make sure the guest operating system (Enterprise Linux) is shutdown, to add a new disk.
2) Open the VMWare Server Console and select the Guest OS in the Inventory tab.
3) On the Commands tab, click Edit Virtual machine settings.
4) A pop window appears, Virtual Machine Settings, with the existing settings, click Add button at the bottom.
 5. Select Hard Disk from the Add Hardware wizard from VMWare Server console & click next to continue further.
 6. Select “Create a new Virtual Disk” and click next to continue
 7. Select a Disk Type – always go with the recommended configuration by VMWare (here I selected as recommended – SCSI) and click next
 8. Specify Disk capacity – in my case, i selected 10GB, and I am not selecting “Allocate all disk space now” as it’s always have a advantage, it will use the host filesystem as the file system grows. Click Next to continue.
 9. Specify Disk File, Location on your local hard disk and click Finish, to complete the Wizard.
 10. You can see the new add disk, Hard Disk 2. You can start the Operating system, from the VMWare Console to setup the hard disk from the operating system level.
 Your new disk is ready at hardware level (Virtual Machine ;-) )
 To setup the newly added disk from the Guest Operating System, please follow the below link.
Wednesday, August 15, 2007
ASMCMD & kfod command in Linux
rac1-> kfod disks=all-------------------------------------------------------------------------------- Disk Size Path================================================================================ 1: 3067 Mb ORCL:VOL1
2: 3067 Mb ORCL:VOL2
3: 2047 Mb ORCL:VOL3
4: 1019 Mb ORCL:VOL4
----------------------------------------------------------------------------ORACLE_SID ORACLE_HOME
======================================================
+ASM1 /u01/app/oracle/product/10.2.0/db_1 +ASM2 /u01/app/oracle/product/10.2.0/db_1 +ASM3 /u01/app/oracle/product/10.2.0/db_1
I found this command more useful, to list ASM Diks and VOLUME Information
2: 3067 Mb ORCL:VOL2
3: 2047 Mb ORCL:VOL3
4: 1019 Mb ORCL:VOL4
----------------------------------------------------------------------------ORACLE_SID ORACLE_HOME
======================================================
+ASM1 /u01/app/oracle/product/10.2.0/db_1 +ASM2 /u01/app/oracle/product/10.2.0/db_1 +ASM3 /u01/app/oracle/product/10.2.0/db_1
I found this command more useful, to list ASM Diks and VOLUME Information
Sunday, June 03, 2007
Automatic Stroage Management (ASM): Adding a disk to a existing Diskgroup
Automatic Storage Management:
Adding a Disk to an existing Disk Group:
Oracle 10G RAC:
In day to day activities DBA needs plan and assign storage to the growing database. It’s a brief idea & procedure about how to add a new disk to an existing disk groups.
* Please refer my other posts on ASM and Linux VMware for adding Disks (Shortly edited)
1. Login as a root user and check for the new disk which was just added at the VMware.
[root@rac1 ~]# fdisk -l
Disk /dev/sda: 32.2 GB, 32212254720 bytes
255 heads, 63 sectors/track, 3916 cylinders
Units = cylinders of 16065 * 512 = 8225280 bytes
[…Truncated]
Disk /dev/sdf doesn't contain a valid partition table
2. Use fdisk to create the partition info for the newly added disk.
*************************************
[root@rac1 ~]# fdisk /dev/sdf
Device contains neither a valid DOS partition table, nor Sun, SGI or OSF disklabel
Building a new DOS disklabel. Changes will remain in memory only,
until you decide to write them. After that, of course, the previous
content won't be recoverable.
Warning: invalid flag 0x0000 of partition table 4 will be corrected by w(rite)
Command (m for help): n
Command action
e extended
p primary partition (1-4)
p
Partition number (1-4): 1
First cylinder (1-261, default 1): 1
Last cylinder or +size or +sizeM or +sizeK (1-261, default 261):
Using default value 261
Command (m for help): w
The partition table has been altered!
Calling ioctl() to re-read partition table.
Syncing disks.
*************************************
3. You can see the new partition info; you can do this on both the Cluster nodes.
******************************************
[root@rac1 ~]# fdisk -l
Disk /dev/sdf: 2147 MB, 2147483648 bytes
255 heads, 63 sectors/track, 261 cylinders
Units = cylinders of 16065 * 512 = 8225280 bytes
Device Boot Start End Blocks Id System
/dev/sdf1 1 261 2096451 83 Linux
[root@rac1 ~]#
****************************************************
NODE 02
[root@rac2 ~]# fdisk -l
Disk /dev/sdf: 2147 MB, 2147483648 bytes
255 heads, 63 sectors/track, 261 cylinders
Units = cylinders of 16065 * 512 = 8225280 bytes
Device Boot Start End Blocks Id System
/dev/sdf1 1 261 2096451 83 Linux
***********************************************
4. In Linux you can use ASM library driver provided by Oracle to configure the new disks.
************************************
oracleasm-support-2.0.3-2
oracleasm-2.6.9-42.0.0.0.1.EL-2.0.3-2
oracleasmlib-2.0.2-1
oracleasm-2.6.9-42.0.0.0.1.ELsmp-2.0.3-2
NODE 01 # Check for existing ASM disks
[root@rac1 ~]# /etc/init.d/oracleasm scandisks
Scanning system for ASM disks: [ OK ]
[root@rac1 ~]# /etc/init.d/oracleasm listdisks
VOL1
VOL2
VOL3
NODE 02 # Check for existing ASM disks
[root@rac2 ~]# /etc/init.d/oracleasm scandisks
Scanning system for ASM disks: [ OK ]
[root@rac2 ~]# /etc/init.d/oracleasm listdisks
VOL1
VOL2
VOL3
*********************************
5. Create ASM disks. Do this on any one node as a root user.
[root@rac1 ~]# /etc/init.d/oracleasm createdisk VOL4 /dev/sdf1
Marking disk "/dev/sdf1" as an ASM disk: [ OK ]
[root@rac1 ~]# /etc/init.d/oracleasm scandisks
Scanning system for ASM disks: [ OK ]
[root@rac1 ~]# /etc/init.d/oracleasm listdisks
VOL1
VOL2
VOL3
VOL4
Check the ASM Disks from NODE 2
[root@rac2 ~]# /etc/init.d/oracleasm scandisks
Scanning system for ASM disks: [ OK ]
[root@rac2 ~]# /etc/init.d/oracleasm listdisks
VOL1
VOL2
VOL3
VOL4
********************************
6. Configure X-Windows and run DBCA as a oracle user from the primary node, to add the disk to a existing disk group.
7. DBCA: Welcome screen: Select Oracle Real Application clusters database
 8. DBCA: Operations Screen: Select Configure Automatic Storage Management ->NEXT
 9. Node Selection: Select both the nodes -> Next
 10. ASM Disk Groups: Select the Disk Group Name, to assing a new disk
 11. Add Disks Screen: Select VOL4, we added before with ASM library
 This ends up adding space to a existing Disk group.
Adding a Disk to an existing Disk Group:
Oracle 10G RAC:
In day to day activities DBA needs plan and assign storage to the growing database. It’s a brief idea & procedure about how to add a new disk to an existing disk groups.
* Please refer my other posts on ASM and Linux VMware for adding Disks (Shortly edited)
1. Login as a root user and check for the new disk which was just added at the VMware.
[root@rac1 ~]# fdisk -l
Disk /dev/sda: 32.2 GB, 32212254720 bytes
255 heads, 63 sectors/track, 3916 cylinders
Units = cylinders of 16065 * 512 = 8225280 bytes
[…Truncated]
Disk /dev/sdf doesn't contain a valid partition table
2. Use fdisk to create the partition info for the newly added disk.
*************************************
[root@rac1 ~]# fdisk /dev/sdf
Device contains neither a valid DOS partition table, nor Sun, SGI or OSF disklabel
Building a new DOS disklabel. Changes will remain in memory only,
until you decide to write them. After that, of course, the previous
content won't be recoverable.
Warning: invalid flag 0x0000 of partition table 4 will be corrected by w(rite)
Command (m for help): n
Command action
e extended
p primary partition (1-4)
p
Partition number (1-4): 1
First cylinder (1-261, default 1): 1
Last cylinder or +size or +sizeM or +sizeK (1-261, default 261):
Using default value 261
Command (m for help): w
The partition table has been altered!
Calling ioctl() to re-read partition table.
Syncing disks.
*************************************
3. You can see the new partition info; you can do this on both the Cluster nodes.
******************************************
[root@rac1 ~]# fdisk -l
Disk /dev/sdf: 2147 MB, 2147483648 bytes
255 heads, 63 sectors/track, 261 cylinders
Units = cylinders of 16065 * 512 = 8225280 bytes
Device Boot Start End Blocks Id System
/dev/sdf1 1 261 2096451 83 Linux
[root@rac1 ~]#
****************************************************
NODE 02
[root@rac2 ~]# fdisk -l
Disk /dev/sdf: 2147 MB, 2147483648 bytes
255 heads, 63 sectors/track, 261 cylinders
Units = cylinders of 16065 * 512 = 8225280 bytes
Device Boot Start End Blocks Id System
/dev/sdf1 1 261 2096451 83 Linux
***********************************************
4. In Linux you can use ASM library driver provided by Oracle to configure the new disks.
************************************
oracleasm-support-2.0.3-2
oracleasm-2.6.9-42.0.0.0.1.EL-2.0.3-2
oracleasmlib-2.0.2-1
oracleasm-2.6.9-42.0.0.0.1.ELsmp-2.0.3-2
NODE 01 # Check for existing ASM disks
[root@rac1 ~]# /etc/init.d/oracleasm scandisks
Scanning system for ASM disks: [ OK ]
[root@rac1 ~]# /etc/init.d/oracleasm listdisks
VOL1
VOL2
VOL3
NODE 02 # Check for existing ASM disks
[root@rac2 ~]# /etc/init.d/oracleasm scandisks
Scanning system for ASM disks: [ OK ]
[root@rac2 ~]# /etc/init.d/oracleasm listdisks
VOL1
VOL2
VOL3
*********************************
5. Create ASM disks. Do this on any one node as a root user.
[root@rac1 ~]# /etc/init.d/oracleasm createdisk VOL4 /dev/sdf1
Marking disk "/dev/sdf1" as an ASM disk: [ OK ]
[root@rac1 ~]# /etc/init.d/oracleasm scandisks
Scanning system for ASM disks: [ OK ]
[root@rac1 ~]# /etc/init.d/oracleasm listdisks
VOL1
VOL2
VOL3
VOL4
Check the ASM Disks from NODE 2
[root@rac2 ~]# /etc/init.d/oracleasm scandisks
Scanning system for ASM disks: [ OK ]
[root@rac2 ~]# /etc/init.d/oracleasm listdisks
VOL1
VOL2
VOL3
VOL4
********************************
6. Configure X-Windows and run DBCA as a oracle user from the primary node, to add the disk to a existing disk group.
7. DBCA: Welcome screen: Select Oracle Real Application clusters database
 8. DBCA: Operations Screen: Select Configure Automatic Storage Management ->NEXT
 9. Node Selection: Select both the nodes -> Next
 10. ASM Disk Groups: Select the Disk Group Name, to assing a new disk
 11. Add Disks Screen: Select VOL4, we added before with ASM library
 This ends up adding space to a existing Disk group.
 ** This is for knowledge purpose of knowing how and was experimented on free version software and Operating systems.
Please refer other posts on Linux VMware & Oracle ASM.
Tuesday, May 29, 2007
Oracle 10gR2 Automatic Storage Management Adding a New Disk Group
Oracle 10gR2 Automatic Storage Management(ASM) :
Adding a New Disk Group in VMware OLE.
Oracle Database Version: 10.2.0.1
Oracle Real Applications Cluster
Oracle ASM
Oracle Enterprise Linux
VMware server 1.0.4
Login in as a root user on both the nodes, as this is a cluster database, configure the ASM disks on both the nodes.
Before going further make sure, that the hardware (New Raw Device) as been added / assigned / available to both the nodes.
1) Check the Existing Raw devices and verifying the availability by scanning the disks as below. It should be done on both the nodes.
************************************************
[root@rac1 ~]# fdisk -l
[…Truncated]
Device Boot Start End Blocks Id System
/dev/sde1 1 261 2096451 83 Linux
Disk /dev/sdf: 8589 MB, 8589934592 bytes
255 heads, 63 sectors/track, 1044 cylinders
Units = cylinders of 16065 * 512 = 8225280 bytes
Disk /dev/sdf doesn't contain a valid partition table
[root@rac1 ~]#
Disk /dev/sdg doesn't contain a valid partition table
[root@rac1 ~]# fdisk /dev/sdg
Device contains neither a valid DOS partition table, nor Sun, SGI or OSF disklab el
Building a new DOS disklabel. Changes will remain in memory only,
until you decide to write them. After that, of course, the previous
content won't be recoverable.
******************************************************
3. Create disk partition of the newly added disk and we will go ahead preparing raw disk for Oracle ASM (/dev/sdf, /dev/sdg).
********************************************
[root@rac1 ~]# fdisk /dev/sdf
Device contains neither a valid DOS partition table, nor Sun, SGI or OSF disklabel
Building a new DOS disklabel. Changes will remain in memory only,
until you decide to write them. After that, of course, the previous
content won't be recoverable.
The number of cylinders for this disk is set to 1044.
There is nothing wrong with that, but this is larger than 1024,
and could in certain setups cause problems with:
1) software that runs at boot time (e.g., old versions of LILO)
2) booting and partitioning software from other OSs
(e.g., DOS FDISK, OS/2 FDISK)
Warning: invalid flag 0x0000 of partition table 4 will be corrected by w(rite)
Command (m for help): n
Command action
e extended
p primary partition (1-4)
p
Partition number (1-4): 1
First cylinder (1-1044, default 1): 1
Last cylinder or +size or +sizeM or +sizeK (1-1044, default 1044):
Using default value 1044
Command (m for help): w
The partition table has been altered!
Calling ioctl() to re-read partition table.
Syncing disks.
[root@rac1 ~]#
* Same for /dev/sdg
***********************************************************
4. Check the Partition information using fdisk -l again
Disk /dev/sdf: 8589 MB, 8589934592 bytes
255 heads, 63 sectors/track, 1044 cylinders
Units = cylinders of 16065 * 512 = 8225280 bytes
Device Boot Start End Blocks Id System
/dev/sdf1 1 1044 8385898+ 83 Linux
5. Create ASM Disk, on any of the Node as the root user.
[root@rac1 ~]# /etc/init.d/oracleasm createdisk VOL4 /dev/sdf1
Marking disk "/dev/sdf1" as an ASM disk: [ OK ]
[root@rac1 ~]#
[root@rac1 ~]# /etc/init.d/oracleasm createdisk VOL5 /dev/sdg1
Marking disk "/dev/sdg1" as an ASM disk: [ OK ]
6. Make sure the ASM disks are visible from every node.
*********************************************
[root@rac1 ~]# /etc/init.d/oracleasm scandisks
Scanning system for ASM disks: [ OK ]
[root@rac1 ~]# /etc/init.d/oracleasm listdisks
VOL1
VOL2
VOL3
VOL4
VOL5
NODE rac2
[root@rac2 ~]# /etc/init.d/oracleasm scandisks
Scanning system for ASM disks: [ OK ]
[root@rac2 ~]# /etc/init.d/oracleasm listdisks
VOL1
VOL2
VOL3
VOL4
VOL5
[root@rac2 ~]#
*********************************
7. Login in as Oracle user and set your x-windows, to run DBCA.
8. Operations: Select Configure Automatic Storage Management from Database Configuration Assistant(DBCA) and click next.
 9. Node Selection: Select the nodes listed, as its a cluster Oracle Database, the Disk group should be visible for both the nodes .
 10. ASM DISK GROUPS: Click on Create New Tab below to create a new disk group.
 11. Create Disk Group: Enter the name, Redundany (normal) & select the member disks for the new group : VOL4 & VOL5. Select both as the redundancy type is normal. ASM needs to Member disks atleast to go with.
 12. ASM Disk Groups: The new diskgroup added just before is seen in the below screen.
 13. Click Finsih, to end the New Disk group. You can add disks, you can create tablespaces in the new disk group.
14. Check from ASMCMD as well,
rac1-> export ORACLE_SID=+ASM1
rac1-> asmcmd
ASMCMD> lsdg
State Type Rebal Unbal Sector Block AU Total_MB Free_MB Req_mir_free_MB Usable_file_MB Offline_disks Name
MOUNTED NORMAL N N 512 4096 1048576 6134 3352 0 1676 0 DG1/
MOUNTED NORMAL N N 512 4096 1048576 16378 16192 0 8096 0 DG2/
MOUNTED EXTERN N N 512 4096 1048576 2047 1873 0 1873 0 RECOVERYDEST/
ASMCMD> ls
DG1/
DG2/
RECOVERYDEST/
ASMCMD>
Adding a New Disk Group in VMware OLE.
Oracle Database Version: 10.2.0.1
Oracle Real Applications Cluster
Oracle ASM
Oracle Enterprise Linux
VMware server 1.0.4
Login in as a root user on both the nodes, as this is a cluster database, configure the ASM disks on both the nodes.
Before going further make sure, that the hardware (New Raw Device) as been added / assigned / available to both the nodes.
1) Check the Existing Raw devices and verifying the availability by scanning the disks as below. It should be done on both the nodes.
****************************
[root@rac1 ~]# /etc/init.d/oracleasm scandisks
Scanning system for ASM disks: [ OK ]
[root@rac1 ~]# /etc/init.d/oracleasm listdisks
VOL1
VOL2
VOL3
[root@rac1 ~]#
[root@rac2 ~]# /etc/init.d/oracleasm scandisks
Scanning system for ASM disks: [ OK ]
[root@rac2 ~]# /etc/init.d/oracleasm listdisks
VOL1
VOL2
VOL3
[root@rac2 ~]#
*****************************
************************************************
[root@rac1 ~]# fdisk -l
[…Truncated]
Device Boot Start End Blocks Id System
/dev/sde1 1 261 2096451 83 Linux
Disk /dev/sdf: 8589 MB, 8589934592 bytes
255 heads, 63 sectors/track, 1044 cylinders
Units = cylinders of 16065 * 512 = 8225280 bytes
Disk /dev/sdf doesn't contain a valid partition table
[root@rac1 ~]#
Disk /dev/sdg doesn't contain a valid partition table
[root@rac1 ~]# fdisk /dev/sdg
Device contains neither a valid DOS partition table, nor Sun, SGI or OSF disklab el
Building a new DOS disklabel. Changes will remain in memory only,
until you decide to write them. After that, of course, the previous
content won't be recoverable.
******************************************************
3. Create disk partition of the newly added disk and we will go ahead preparing raw disk for Oracle ASM (/dev/sdf, /dev/sdg).
********************************************
[root@rac1 ~]# fdisk /dev/sdf
Device contains neither a valid DOS partition table, nor Sun, SGI or OSF disklabel
Building a new DOS disklabel. Changes will remain in memory only,
until you decide to write them. After that, of course, the previous
content won't be recoverable.
The number of cylinders for this disk is set to 1044.
There is nothing wrong with that, but this is larger than 1024,
and could in certain setups cause problems with:
1) software that runs at boot time (e.g., old versions of LILO)
2) booting and partitioning software from other OSs
(e.g., DOS FDISK, OS/2 FDISK)
Warning: invalid flag 0x0000 of partition table 4 will be corrected by w(rite)
Command (m for help): n
Command action
e extended
p primary partition (1-4)
p
Partition number (1-4): 1
First cylinder (1-1044, default 1): 1
Last cylinder or +size or +sizeM or +sizeK (1-1044, default 1044):
Using default value 1044
Command (m for help): w
The partition table has been altered!
Calling ioctl() to re-read partition table.
Syncing disks.
[root@rac1 ~]#
* Same for /dev/sdg
***********************************************************
4. Check the Partition information using fdisk -l again
Disk /dev/sdf: 8589 MB, 8589934592 bytes
255 heads, 63 sectors/track, 1044 cylinders
Units = cylinders of 16065 * 512 = 8225280 bytes
Device Boot Start End Blocks Id System
/dev/sdf1 1 1044 8385898+ 83 Linux
5. Create ASM Disk, on any of the Node as the root user.
[root@rac1 ~]# /etc/init.d/oracleasm createdisk VOL4 /dev/sdf1
Marking disk "/dev/sdf1" as an ASM disk: [ OK ]
[root@rac1 ~]#
[root@rac1 ~]# /etc/init.d/oracleasm createdisk VOL5 /dev/sdg1
Marking disk "/dev/sdg1" as an ASM disk: [ OK ]
6. Make sure the ASM disks are visible from every node.
*********************************************
[root@rac1 ~]# /etc/init.d/oracleasm scandisks
Scanning system for ASM disks: [ OK ]
[root@rac1 ~]# /etc/init.d/oracleasm listdisks
VOL1
VOL2
VOL3
VOL4
VOL5
NODE rac2
[root@rac2 ~]# /etc/init.d/oracleasm scandisks
Scanning system for ASM disks: [ OK ]
[root@rac2 ~]# /etc/init.d/oracleasm listdisks
VOL1
VOL2
VOL3
VOL4
VOL5
[root@rac2 ~]#
*********************************
7. Login in as Oracle user and set your x-windows, to run DBCA.
8. Operations: Select Configure Automatic Storage Management from Database Configuration Assistant(DBCA) and click next.
 9. Node Selection: Select the nodes listed, as its a cluster Oracle Database, the Disk group should be visible for both the nodes .
 10. ASM DISK GROUPS: Click on Create New Tab below to create a new disk group.
 11. Create Disk Group: Enter the name, Redundany (normal) & select the member disks for the new group : VOL4 & VOL5. Select both as the redundancy type is normal. ASM needs to Member disks atleast to go with.
  12. ASM Disk Groups: The new diskgroup added just before is seen in the below screen.
  13. Click Finsih, to end the New Disk group. You can add disks, you can create tablespaces in the new disk group.
 14. Check from ASMCMD as well,
rac1-> export ORACLE_SID=+ASM1
rac1-> asmcmd
ASMCMD> lsdg
State Type Rebal Unbal Sector Block AU Total_MB Free_MB Req_mir_free_MB Usable_file_MB Offline_disks Name
MOUNTED NORMAL N N 512 4096 1048576 6134 3352 0 1676 0 DG1/
MOUNTED NORMAL N N 512 4096 1048576 16378 16192 0 8096 0 DG2/
MOUNTED EXTERN N N 512 4096 1048576 2047 1873 0 1873 0 RECOVERYDEST/
ASMCMD> ls
DG1/
DG2/
RECOVERYDEST/
ASMCMD>
Automatic storage management is a new feature in Oracle Database 10g that provides the solution for the DBA storage Management challeneges.
ASM enables the DBA to change the storage configuration without having to take the database offline. ASM automatically rebalances files across the disk group after disks have been added or dropped.
Subscribe to:
Posts (Atom)

