VMWare Version 1.0.8
Host Operating System: Windows XP – 32 Bit
Guest Operating System: OLE 4 (Update 5)
Oracle RDBMS Version: 11.1.0.6.0
Prerequisites
1. Oracle Software 11.1.0.6 should already installed on the server.
Click here -> For Step by step http://ravidba-oracle.blogspot.com/2008/07/oracle-11g-step-by-step-installation-on.html
2. Raw disks should already be formatted using fdisk and should be available to the server.
3. Disk Label should be created with ORACLE ASM LIB.
http://ravidba-oracle.blogspot.com/2007/05/oracle-10gr2-automatic-storage.html
oracleasmlib-2.0.2-1.i386.rpm (or) you can configure this when you setup Linux by selecting
System Tools -> oracle oracleasm-2.6.9.. (driver for UP kernel).
[root@oracledb2 init.d]# ls -ltr oracleasm*
-rwxr-xr-x 1 root root 18114 Oct 24 2006 oracleasm
[root@oracledb2 init.d]# pwd
/etc/init.d
Usage: /etc/init.d/oracleasm {startstoprestartenabledisableconfigurecreatediskdeletediskquerydisklistdisksscandisksstatus}
http://ravidba-oracle.blogspot.com/2007/05/oracle-10gr2-automatic-storage.html
For rest of the steps please follow the above URL to add the disks using oracleasm.
[root@oracledb2 init.d]# /etc/init.d/oracleasm listdisks
VOL1
VOL2
VOL3
Once you have the disks in place, login as Oracle user and run DBCA
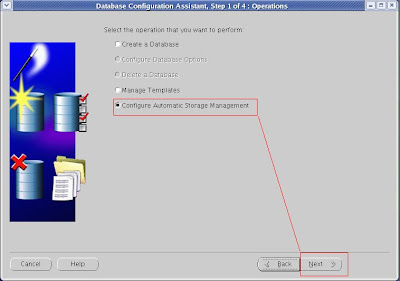
1. Select Configure Automatic Storage Management : Step 1 of 4 -> Click Next
 2. A warning screen will appear. For ASM (Automatic Storage Management) the Oracle Cluster Synchronization Service (CSS) needs to be running. All you need to do is - login as a root user and run the localconfig reset from $ORACLE_HOME/bin directory, as shown in the below screen.
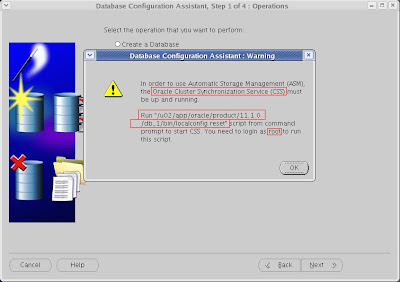 3. Open a termial / Putty section login as a root user, and execute localconfig reset from $ORACLE_HOME/bin.
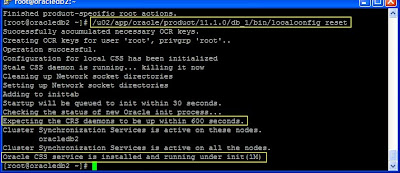 Once you have the message "Oracle CSS service is installed and running under init" you can click "OK" at the warning screen.
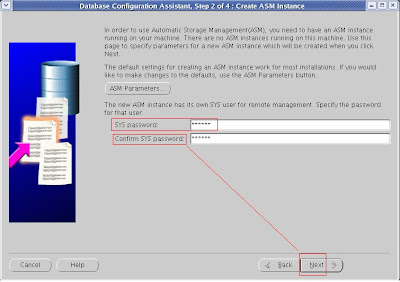
4. Specify the password for the SYS user. (This is for ASM Instance).
 5.
5.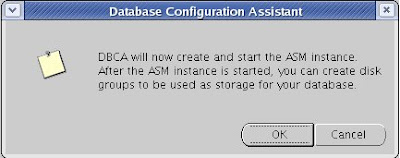 6.
6. 7. I have missed few of the screens, you need to assign the Disk Group Name, assign the Volumes that we create before and select the redundancy. I created two Disk Group's.
 +DATA/DB11G
CONTROLFILE/
DATAFILE/
ONLINELOG/
PARAMETERFILE/
TEMPFILE/
spfiledb11g.ora => +DATA/DB11G/PARAMETERFILE/spfile.280.674840503
And the second group RECOVERYDEST/ for FLASH recovery area.
8. Mount the Disks - Click Mount All


what is the link to your next post?
ReplyDeletehttp://dba-onweb.blogspot.com/ Click here...for my next post and all posts
ReplyDeleteDear Ravi,
ReplyDeleteWe are going through a problem while using the setup of oracle 11g release 2 which we downloaded from oracle.com. had a new server hardware with 6core and raid and 16gb ram. old server very slow. therefore looking forward to improve the total administration and use the benefits of new features of ASM.
Getting lost with so many un-necessary information flying around on the web. Came accross your blog which seems to be helpful.
Could you guide us to a successful setup of 11g.
please note the screens shots above are not the same we get on r2 setup of 32\64bit.no idea why so?
was looking for a checklist and simple chronological method of following the entire setup of oracle 11g with configurations of asm.
looking forward to you help.
thanks and best regards,
ramesh
Dear Ramesh, please provide your email. the above configuration is on 11gR1. Thanks
ReplyDeleteNice blog
ReplyDeletei want solution for my problem
ReplyDeletethat is we r using sql in main server and we r using oracle in another two servers from sql to one of the oracle server we r using mapping and main problem is how to create redundancy between these two oracle servers and the operating system we r using is windows server 2008
pls send me the solution as early as possible