


Oracle Critical Patch Update - January 2009
CPU Patch released for January 2009. For details,
http://www.oracle.com/technology/deploy/security/alerts.htm?msgid=7301948

Custom Search
Thursday, January 15, 2009
Oracle 11g: oracle.sysman.emcp.exception.EMConfigException: Error starting Database Control
SEVERE: Error starting Database Control
I was asked to check with this error which was generated at the time of Database creation on Windows XP SP2 failed at 86% showing the below error.
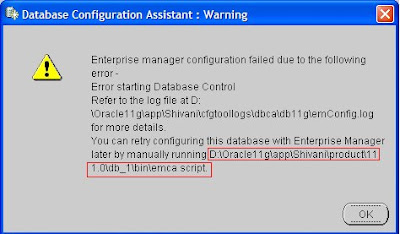
Refer to the log file at D:\Oracle11g\app\Acer-5670\cfgtoollogs\dbca\db11g\emConfig.log for more details.
Jan 15, 2009 7:44:08 PM oracle.sysman.emcp.EMConfig perform
CONFIG: Stack Trace:
I was asked to check with this error which was generated at the time of Database creation on Windows XP SP2 failed at 86% showing the below error.
Jan 15, 2009 7:44:08 PM oracle.sysman.emcp.EMConfig perform
SEVERE: Error starting Database Control
Refer to the log file at D:\Oracle11g\app\Acer-5670\cfgtoollogs\dbca\db11g\emConfig.log for more details.
Jan 15, 2009 7:44:08 PM oracle.sysman.emcp.EMConfig perform
CONFIG: Stack Trace:
oracle.sysman.emcp.exception.EMConfigException: Error starting Database Control
at oracle.sysman.emcp.EMDBPostConfig.performConfiguration(EMDBPostConfig.java:869)
at oracle.sysman.emcp.EMDBPostConfig.invoke(EMDBPostConfig.java:250)
at oracle.sysman.emcp.EMDBPostConfig.invoke(EMDBPostConfig.java:213)
at oracle.sysman.emcp.EMConfig.perform(EMConfig.java:235)
at oracle.sysman.assistants.util.em.EMConfiguration.run(EMConfiguration.java:460)
at java.lang.Thread.run(Thread.java:595)
Jan 15, 2009 7:44:08 PM oracle.sysman.emcp.EMConfig restoreOuiLoc
CONFIG: Restoring oracle.installer.oui_loc to D:\Oracle11g\app\Acer-5670\product\11.1.0\db_1\oui
1. I created a loop back adapter and disabled all the remaining Network connections which did not work.
To create a Loop Back Adapter in Windows XP ->
http://dba-onweb.blogspot.com/2008/01/microsoft-loopback-adapter.html
2. Second Approach – Installed JAVA (http://www.java.com/) and rebooted the laptop to start the DBCA once again to do a fresh setup which in turn worked.
Saturday, January 10, 2009
Re-Synchronize/Refresh a Table in Oracle Streams
The purpose of this article is to outline the steps for Re-Synchronize/Refresh a single table if it is out of sync with source site in one-way replication between two ORACLE databases in Streams environment.
Example:
Schema:SCOTT
Table:EMP
Steps for Refreshing a Table in Streams:
If one of the tables on the Target site is out of Sync with Source site then follow below steps to re-synchronize both:
1. Stop Capture Process on Source(S)
2. Stop Propagation Process on Source(S)
3. Stop Apply Process on Target(T)
4. Delete the apply errors on Target(T)
5. Truncate the problem table on Target(T)
6. Re-instantiate the problem table on Source(S)
7. Synchronize the problem table through exp/imp
8. Start the apply Process on Target(T)
9. Start the propagation Process on the Source(S)
10. Start the Capture Process on the Source(S)
read the full post...
Wednesday, January 07, 2009
RAC CRS - crs_unregister
How to remove CRS entries using crs_unregister?
1. Before using crs_unregister, it's always recommended to backup OCR and voting disks. Make sure that you have a documented version to restore, if things go wild.
2. Nodeapps needs to be stopped on all the nodes (In my case I have 2 nodes).
3. You can use crs_unregister to remove the entries which are not required, here in my example I did with listener which I configured wrongly and I want this entry to be removed from CRS.
crs_unregister ora.testrac1p.LISTENER_RACDB_TESTRAC1P.lsnr
crs_unregister ora.testrac2p.LISTENER_RACDB_ TESTRAC1P.lsnr
4. Once you have removed the entries using crs_unregister, use srvctl to reflect the removed entries.
$ srvctl config listener -n testrac1p
$ srvctl config listener -n testrac2p
$ crs_stat -v
5. Once the listener entries are removed, you can use netca (NETCA) to configure the Listeners.
6. Start the Nodeapps on all the nodes
Monday, January 05, 2009
How to become an Oracle DBA?
Lesson 01
This is where I started 7 years back, and sharing my thoughts from few years. 7 years back, database administrator is very less known and when I started working out to be a Database Administrator, I opted to take a course from Oracle University affiliated SQL * International, of course its costly I felt its better and it worked for me. At that time, I used to browse for online documents, used to find very less. These days we have more documents on line, Oracle Forums for new aspirants, so many websites offer lot.
As a starter you have plenty of options, if you are a self starter you can browse Oracle Documentation on line and you can start learning.
http://www.oracle.com/pls/db102/homepage
http://www.oracle.com/pls/db102/homepage
In this post and upcoming posts I will discuss the topics to concentrate.
1. Get familiar with the Oracle Database Users and their responsibilities, it will help you to understand the roles and responsibilities and of course that you want to concentrate to become a Database administrator.
You can find more information on http://download.oracle.com/docs/cd/B19306_01/server.102/b14231/dba.htm#sthref57
It will give you a basic understanding of database administrator. It’s the stepping stone. I don’t want to talk much about SQL, PL/SQL. Assuming that you already aware of this. Basics is well to go with, you don’t need to be a mater in PL/SQL.
2. What type of activities does Database administrator do?
Database Administrators as so many responsibilities which he/she needs to deliver. So get to know what the tasks of a DBA.
http://download.oracle.com/docs/cd/B19306_01/server.102/b14231/dba.htm#i1006205
Going with the above, you might get to know what a DBA can do and you might be prepared to get ready to learn Oracle Database.
3. How to go-ahead after this?
Download Oracle Database 10gR2 for your operating system; initially you can use your Windows XP Professional where you can install Oracle Database Software easily. If you have good exposure on Linux, well I suggest you to try working out.
On Windows
http://www.oracle.com/technology/obe/10gr2_db_single/install/wininst/wininst_otn.htm
On Linux
http://www.oracle.com/technology/pub/articles/smiley_10gdb_install.html
This gives you a good start, and of course hands on experience which is must for a DBA. So keep working I will come up with my next post on what to do once you have Oracle Database on your Laptop/Desktop/Workstation.
On Linux
http://www.oracle.com/technology/pub/articles/smiley_10gdb_install.html
This gives you a good start, and of course hands on experience which is must for a DBA. So keep working I will come up with my next post on what to do once you have Oracle Database on your Laptop/Desktop/Workstation.
Sunday, January 04, 2009
We moved successfully
We just moved to this blog DBA-ONWeb from ravidba-oracle.blogspot.com which used to be my blog for almost 4 years. We will keep this blog posted with all the resource and the issues we have faced and of course the way we try to resolve the issues.
Wishing you all, a good year a head…
Ravi Prakash
Saturday, January 03, 2009
Oracle Streams 10gR2 Implementaion - Table Level
Oracle Streams 10gR2 Step by Step
Purpose:
RDBMS Version: 10gR2 (10.2.0.3) -> download Oracle 10gR2
Operating System: Oracle Enterprise Linux 4.5 -> download from E-delivery
Source database (S): ORCL.ORACLEDB1.KRISH.COM 192.162.2.138
Target database (T): MYDEV.ORACLEDB2.KRISH.COM 192.162.2.139
Source Schema: SCOTT
Target Schema: SCOTT
Replication Tables:
EMP,
DEPT,
SALGRADE,
BONUS
Streams Setup Steps:
Following sequence of steps are required in order to implement streams with no downtime.
1. Set parameters Relevant to Streams (S & T)
2. Set up ARCHIVELOG mode (S & T)
3. Create separate Tablespace for stream admin user (S & T)
4. Setup streams admin user (S & T)
5. Create a database link on source (S)
6. Setup Streams queues on both Source(S) and Target (T)
7. Setup supplemental logging on Source(S)
8. Configure capture process (S)
9. Configure propagation process (S)
10.Create destination tables (Metadata-only export/import) on Target (T)
11.Set Instantiation of tables from Source(S)
12.Export, Import of tables(Data) from Source(S) to Target (T)
13.Grant object privileges to stream admin user (T)
14.Configure apply process on Target(T)
15.Start the apply process (T) and Capture process(S)
.............. Continued ->Click Here
Purpose:
Oracle Streams enables the sharing of data and events in a data stream, either within a database or from one database to another.
The purpose of this document is to outline the steps for setting up one-way replication between two ORACLE databases using streams at table level.
RDBMS Version: 10gR2 (10.2.0.3) -> download Oracle 10gR2
Operating System: Oracle Enterprise Linux 4.5 -> download from E-delivery
Source database (S): ORCL.ORACLEDB1.KRISH.COM 192.162.2.138
Target database (T): MYDEV.ORACLEDB2.KRISH.COM 192.162.2.139
Source Schema: SCOTT
Target Schema: SCOTT
Replication Tables:
EMP,
DEPT,
SALGRADE,
BONUS
Streams Setup Steps:
Following sequence of steps are required in order to implement streams with no downtime.
1. Set parameters Relevant to Streams (S & T)
2. Set up ARCHIVELOG mode (S & T)
3. Create separate Tablespace for stream admin user (S & T)
4. Setup streams admin user (S & T)
5. Create a database link on source (S)
6. Setup Streams queues on both Source(S) and Target (T)
7. Setup supplemental logging on Source(S)
8. Configure capture process (S)
9. Configure propagation process (S)
10.Create destination tables (Metadata-only export/import) on Target (T)
11.Set Instantiation of tables from Source(S)
12.Export, Import of tables(Data) from Source(S) to Target (T)
13.Grant object privileges to stream admin user (T)
14.Configure apply process on Target(T)
15.Start the apply process (T) and Capture process(S)
.............. Continued ->Click Here
Thursday, January 01, 2009
Agent configuration in databases Grid Control
Delete the targets from OMS including the old agent registration;
Log into Grid
-> Targets
-> All Targets
-> Search for targets of type Agent
-> Select radio button of one of the Agents of status
-> Remove
You will get an error screen that it is monitoring targets and cannot be removed.
-> Follow the "Click here for the list of targets running on the host".
-> Select All
-> Remove
-> Remove
Log into Grid
-> Targets
-> All Targets
-> Search for targets of type Agent
-> Select radio button of one of the Agents of status
-> Remove
You will get an error screen that it is monitoring targets and cannot be removed.
-> Follow the "Click here for the list of targets running on the host".
-> Select All
-> Remove
The non-clustered targets will be removed after you click OK. The clustered targets have to be removed one at a time.
-> Select one of the remaining clustered targets (if any on that host).-> Remove
You get a warning about the agent cannot be contacted.
Check the "Ignore the status of the agent(s)" check box.
Press YES. Repeat as necessary.
Only the two competing agents should still be listed on the node.
Only the two competing agents should still be listed on the node.
Select the one with status and Remove.
This may give you an error that it's still monitoring targets.
Press OK
Repeat steps h - p as necessary until it finally removes all databases/listeners/asm.
This may give you an error that it's still monitoring targets.
Press OK
Repeat steps h - p as necessary until it finally removes all databases/listeners/asm.
When nothing but the two agents appears on the list but the agent still won't delete, follow the link to the old agent and remove the host from the list of monitored targets on the agent status page.
Repeat steps b - f and the agent should finally go away.
Finish removing all targets before proceeding to rediscovery.
Rediscover targets on the nodes via the new agent.
Log into Grid
-> Targets
-> Databases
-> Add
Click the flashlight
Select the host you just cleaned out in step 1.
-> Select
-> Continue
If prompted whether to discover targets only on this node or on all hosts in the cluster, select all hosts in the cluster and continue.
Wait for discovery to complete (this can take a while especially if the node is clustered).
The list of discovered targets will be displayed. Any targets with a pink wrench will need you to specify the connection password. If you don't know or can't find the current value, just reset the password and then enter the new password in the configuration screen.
Even after discovery completes, you may still need to find and configure the dbsnmp passwords for some of the databases.
Subscribe to:
Posts (Atom)

